
mod_evasive is an Apache web server module that helps protect the server against some types of DoS, DDoS, and brute force attacks. When the total number of requests made to the server exceeded a certain number in the specified time frame, the evasive module took necessary actions to slow down or discard the excess requests originating from the same IP address.
How mod_evasive module work
mod_evasive is one of the core security module that can be utilized to protect servers against DoS and DDoS attacks. Here is how it works:
- Monitoring: When enabled, mod_evasive monitors the incoming HTTP traffic. It keeps track of how many requests are made to the server from an IP address in a certain period of time.
- Detection: You can configure mod_evasive threshold to limit the number of requests coming from an IP address in the specified time frame.
- Action: When HTTP requests coming from an IP address reached the limit of requests in limited time frame (or in other words, when HTTP requests hit the mod_evasive threshold), mod_evasive took necessary actions to slow down the impact of excess requests by either delaying the response to that IP address or by sending 403 response to forbid that IP address from accessing the resources for specific time.
When an IP address makes tons of HTTP requests to the Apache web server in a short period of time, mod_evasive responds with 403 forbidden error to slow down the impact of excessive requests on the server.
Setup mod_evasive module in Ubuntu
In this section, you'll get to know how you can configure mod_evasive module on Apache web server in Ubuntu. For this demonstration, I'm using Ubuntu 22.04.2 LTS and Apache 2.4.52.Let's start by installing the required system packages. Use the following command:
sudo apt update && sudo apt -y install apache2-utils libapache2-mod-evasive
After executing the above command to update system repositories and install the mod_evasive module, use apachectl -M|grep evasive command to check the status of the module.

If you are seeing the same output as above image, then your mod_evasive module is successfully installed and enabled.
Configuring mod_evasive
Now in order to start using it, first we need to configure it and set the threshold for incoming HTTP requests. Use the below command to open Its configuration file and make the following changes:
sudo nano /etc/apache2/mods-enabled/evasive.conf
<IfModule mod_evasive20.c>
    DOSHashTableSize    3907
    DOSPageCount        2
    DOSSiteCount        50
    DOSPageInterval     1
    DOSSiteInterval     1
    DOSBlockingPeriod   100
    DOSEmailNotify      [email protected]
    #DOSSystemCommand    "su - someuser -c '/sbin/... %s ...'"
    DOSLogDir           "/var/log/mod_evasive"
</IfModule>
- DOSHashTableSize is used to set the size of hash table. This table is used by mod_evasive to monitor activity related to IP address. It's considered best practice to use prime number while choosing hash size to prevent hash collisions. Hash collison happens when multiple clients or IP data are assigned to the same slot in the hash table.
- DOSPageCount sets the threshold for the maximum number of requests allowed for a single page or resource from a client.
- DOSSiteCount sets the threshold for the maximum number of requests allowed for the entire website from a client.
- DOSPageInterval directive sets the page interval time in seconds. DOSPageCount requests are counted against this time interval.
- DOSSiteInterval directive sets the site interval time in seconds. DOSSiteCount requests are counted against this time interval.
- DOSBlockingPeriod is used to set the time period (in seconds) for denying or slowing down incoming requests from an IP address that reached the threshold.
- DOSEmailNotify is a way to alert the server admin by sending a mail when mod_evasive detects and take action against malicious activity.
- DOSSystemCommand attribute is used to set a command that will be executed when mod_evasive detects an IP address crossing the threshold. We are not using it in this demonstration, which is why It's commented.
- DOSLogDir directive sets the absolute path of directory where mod_evasive will log It's activity and actions.
Now save and close the file. You can modify these options according to your needs. To check syntax errors in mod_evasive configuration file, run apache2ctl -t command.

If you get the output like image above, that means your mod_evasive configuration is correct. If you get any error, It'll be displayed here in the output and you'll have to open the configuration file and correct those errors.
Creating logs directory
Now before we move forward in the testing section, we first need to create a logs directory for mod_evasive with appropriate permissions. Use the below commands to achieve this:
sudo mkdir /var/log/mod_evasive
$
sudo chown -R root:www-data /var/log/mod_evasive
$
sudo chmod -R 770 /var/log/mod_evasive
These commands will create a new directory mod_evasive in /var/log that will contain all the mod_evasive logs. We also set the appropriate user and access permissions for this directory. Make sure your logs directory location aligns with the path that you specify in configuration file under DOSLogDir directive.
Testing mod_evasive
In order to test the effectiveness of mod_evasive, we'll run a simple script to check If It's working as expected or not. Open a new file nano script.pl and copy the below perl script:
#!/usr/bin/perl

use LWP::UserAgent;
my $target_url = "http://localhost";
my $user_agent = LWP::UserAgent->new;

my $num_requests = 100;
my $sleep_time = 0;
my $attacker_ip = "127.0.0.1";

for (my $i = 0; $i < $num_requests; $i++) {
    my $response = $user_agent->get($target_url, 'X-Forwarded-For' => $attacker_ip);

    if ($response->is_success) {
        print "Request $i: Success\n";
    } else {
        print "Request $i: " . $response->status_line . "\n";
    }
    sleep $sleep_time if $i < $num_requests - 1;
}
print "Done.\n";
To test this script, first disable the mod_evasive module and check the response. To disable the module, use the below command:
sudo a2dismod evasive && sudo systemctl restart apache2
After disabling and restarting the Apache web server, execute the Perl script using perl script.pl command and check the response.
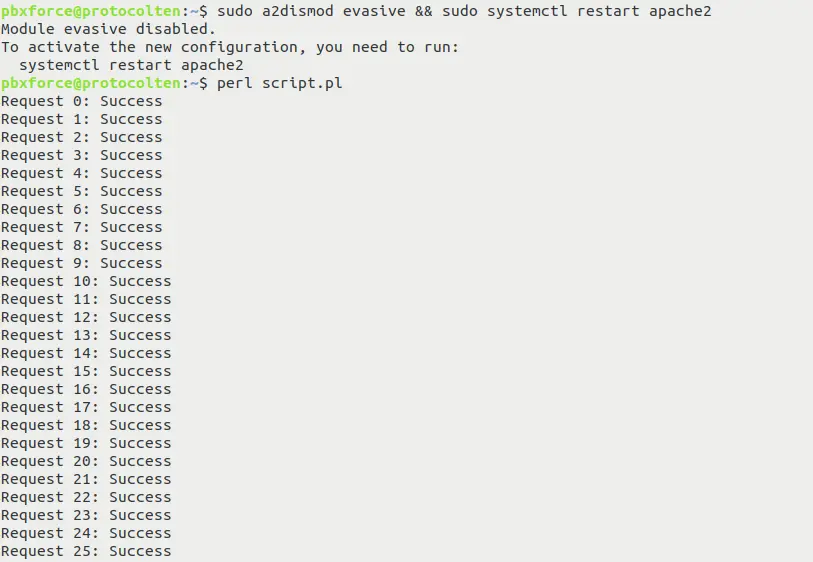
Run this script from the same system where your Apache server is installed. This script will make 100 HTTP requests to the Apache server while keeping mod_evasive module disabled. As you can see in the response, apache is allowing these excessive requests.
Now enable the mod_evasive module and run the script again to check the response:sudo a2enmod evasive && sudo systemctl restart apache2
$
perl script.pl
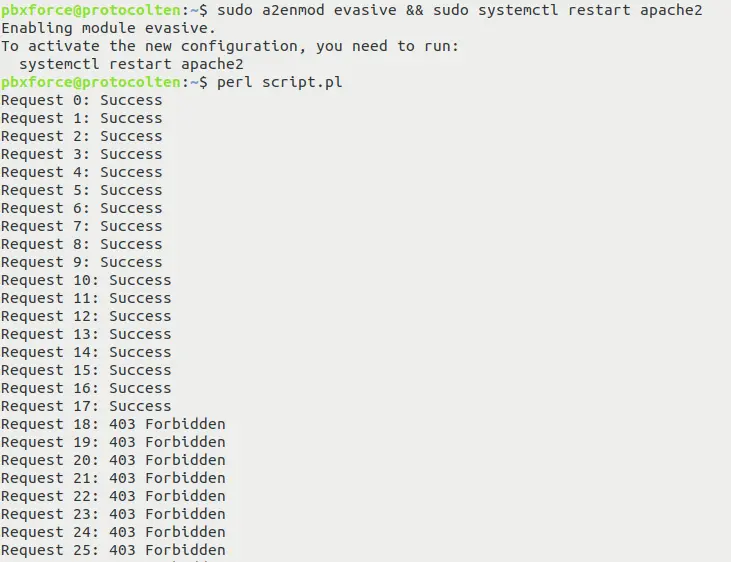
Here you can see that after handling some requests successfully, mod_evasive detects the excessive HTTP requests and denies access to those requests by responding with 403 code.
Conclusion
This is a very basic mod_evasive configuration that can be very effective while defending your web server from DoS and DDoS attacks. For more advanced approach, explore more directives of mod_evasive and modify existing values in the configuration file as required. Please keep in mind that while this module plays an important role in the line of defense against flooding attacks, you cannot rely on it alone because mod_evasive slows down the impact of excessive requests on Apache but does not entirely mitigate it. Use other tools like WAF alongside mod_evasive to harden the security of web server.