Firewalld is a powerful dynamic firewall management tool whose sole purpose is to manage firewall rules dynamically and more efficiently. While being the default firewall for many Fedora based distributions, it can also be used on other distributions as well. Firewalld interacts with nftables or nftables to manage incoming and outgoing network traffic in Linux systems using pre-defined rules.
Getting started
Nowadays in modern Linux operating systems, iptables has been replaced by nftables that offers more consistency, improved performance, and multiple protocol support. These are managed by creating rules that specifically restrict or allow access to a particular resource.
You can create a rule in nftables to manage network traffic but making direct changes in nftables required more skills and knowledge but doing direct changes will give you more control, flexibility, and the ability to customize.
In this article, I'll be using CentOS 7 but you can use any Fedora based Liunx distribution. In newer versions of Linux systems, nftables are used to manage network traffic flow while Firewalld acts as a front-end to manage firewall rules.
Before starting, make sure Firewalld is installed in your system and Its daemon is activated and enabled on system startup. Use below commands:
sudo yum -q list firewalld

Firewalld package is installed in my system. If your system does not have firewalld package, use sudo yum -y install firewalld to install.
Now check the Firewalld system daemon in active and enabled. Use below command:
sudo systemctl status firewalld

In my system, Firewalld is in running state and is enabled on system startup. if your system does not have the same, use sudo systemctl enable --now firewalld command.
Understanding zones in firewalld
Zones represent different environments where each environment has a different level of trust associated. Each zone has Its own pre-defined security rules that manage the incoming and outgoing traffic flow of the network. To get the list of all available zones, use this command:
sudo firewall-cmd --get-zones

These are the available zones in firewalld. Each of them has their own set of rules and access level. Lets have a look at them.
- Block zone: As the name indicates, all the incoming connection requests are blocked and an ICMP message is sent to the sender notifying that packets are rejected. It's useful when high level of security is required with strict rules to block all incoming traffic. To get info about this zone, use
sudo firewall-cmd --info-zone=blockcommand. - Dmz zone: Stands for demilitarized zone. It's used to allow public access to limited resources or services but isolated from your internal network. Only selected external or public sources are allowed to access the specific services like remote connection via SSH. To get info about this zone, use
sudo firewall-cmd --info-zone=dmzcommand. - Drop zone: It is similar to block zone. It drops all the inbound traffic but without sending any packet drop notification to the sender. Silently denying inbound traffic without any feedback can be helpful to avoid DoS attacks. To get info about this zone, use
sudo firewall-cmd --info-zone=dropcommand. - External zone: This zone is used for networks that are neither trusted nor untrusted. It is designed for networks directly connected to the system but treated as external networks. Its purpose is to provide a level of security that is in between public and internal zones. To get info about this zone, use
sudo firewall-cmd --info-zone=externalcommand. - Home zone: Used especially for home networks having the most relaxed security rules. It allows commonly used services and applications by default. To get info about this zone, use
sudo firewall-cmd --info-zone=homecommand. - Public zone: It's the default zone with strict rules, intended for untrusted or public networks. Except for some selected services or resources, other inbound traffic is dropped. To get info about this zone, use
sudo firewall-cmd --info-zone=publiccommand. - Trusted zone: Applied when networks are considered highly secure or trusted. It's specifically for internal networks where most of the inbound traffic is allowed. To get info about this zone, use
sudo firewall-cmd --info-zone=trustedcommand. - Work zone: It's designed for networks within the organization that are considered as secure but not secure as trusted zone. It offers moderate level of access while maintaining security for work-related activities. To get info about this zone, use
sudo firewall-cmd --info-zone=workcommand.
These are pre-defined zones in firewalld. Zone files can be found in cd /usr/lib/firewalld/zones directory. Use cat <zone-name> command in this directory to know more about that specific zone.
List of services allowed in each firewalld zone
To get the list of services allowed in all the available zones, use the below command in the terminal:
for zone in `sudo firewall-cmd --get-zones`;do echo "$zone zone:" `sudo firewall-cmd --list-services --zone=$zone`; done

Default firewalld zone details
Curently active zone is set as default zone in firewalld. To know which zone is being used as default, use below command:sudo firewall-cmd --get-default-zone
$
sudo firewall-cmd --list-all
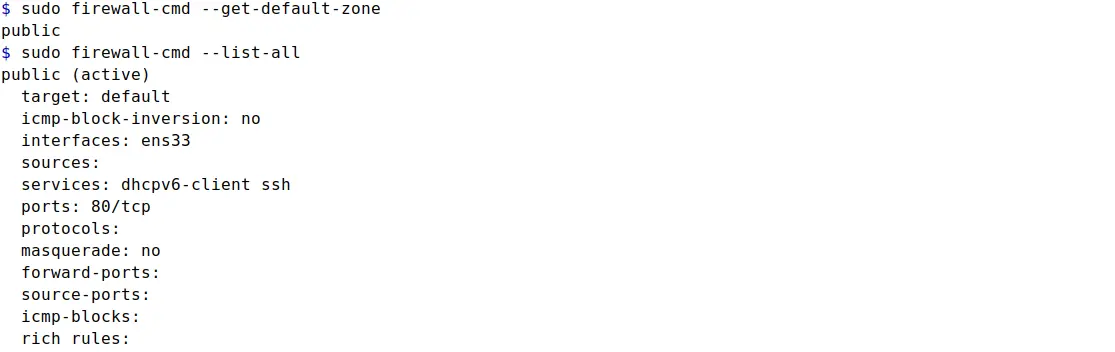
As you can see in the image, first command gives the name of default zone public that is being used and the second command provides the detail of what services and resources are allowed.
Get details of specific zone
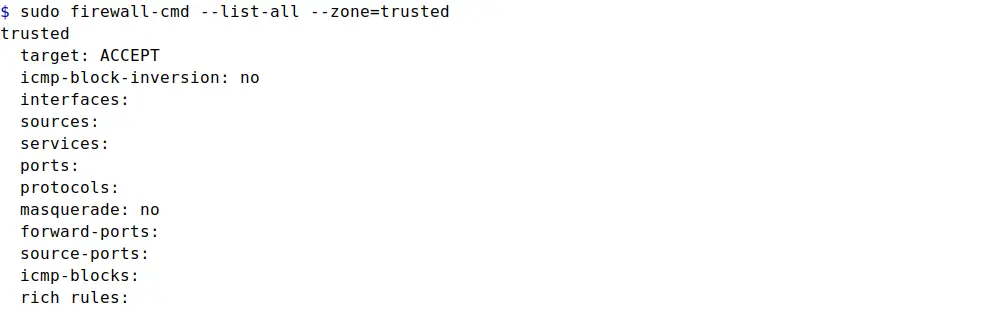
Suppose you want to get the detail of trusted zone. You can achieve it by using the below command with specified options:
sudo firewall-cmd --list-all --zone=trusted
Change default firewalld zone
To change the default zone from public to trusted and verify the change, use the following commands:
sudo firewall-cmd --set-default-zone=trusted
$
sudo firewall-cmd --list-all

Above image verifies that the first command changed the default zone and the other command list the default zone details. Lets change the default zone back to public using sudo firewall-cmd --set-default-zone=public command to proceed further in the article.
Service rule in firewalld
By default, all inbound traffic is denied by firewalld. Suppose you want your system to accept incoming remote access connections and to achieve this, you need to add an allow rule for ssh service in firewalld. Use this command:
sudo firewall-cmd --add-service=ssh
Please keep in mind that the above command will temporarily allow the ssh service to accept incoming remote connection to the system. Changes made using the above command are not persistent across system reboot or firewall reload.
To permanently add the rule in firewalld, use --permanent option as used in below command:
sudo firewall-cmd --permanent --add-service=ssh
Allow rule for SSH service is permanently added in firewalld. When you make changes in firewalld, those changes might not take effect immediately. So you have to reload firewalld or restart firewalld daemon to apply changes. Restarting daemon might disrupt the existing connection, which is why It's always preferred to use reload instead of restarting daemon. Use command:
sudo firewall-cmd --reload
sudo firewall-cmd --list-services

With ssh service rule added in firewalld, system is allowed to accept incoming remote access requests. Just remember, rules added without --permanent option will be effective immediately but won't be preserved after system or firewall reboot. Rules added with --permanent option will require firewall reload to make changes effective but the changes will be permanent and preserved across reboot.
To add a firewall rule for multiple services, use below command:sudo firewall-cmd --permanent --add-service={ssh,ftp}
This single command will add both ssh and ftp services in the firewall. You can add more than two services using the above syntax. To get the list of available services, use sudo firewall-cmd --get-services or use below command:
for service in `sudo firewall-cmd --get-services`;do echo $service;done
This will provide you with an easily readable list of available services that you can use to create firewall rules.
Port rule in firewalld
Any service or applications that need to receive inbound connection, allow rule for that service must be added in the firewall. To add port allow rule, use below command:
sudo firewall-cmd --permanent --add-port=1147/tcp

Here I added a rule for 1147/tcp port in firewall. Any service or application utilizing tcp 1147 port in the system, will be allowed to accept incoming connection requests.
To add firewall rule for multiple ports, use below command:sudo firewall-cmd --permanent --add-port={1147/tcp,1146/tcp}
This will allow incoming network traffic on 1147/tcp and 1146/tcp ports. Make sure the syntax is correct because even an extra space can cause an error in the execution of script.
Port forward rule in firewalld
Port forwarding is a powerful tool if used carefully. It's the technique of forwarding incoming traffic from one port to another in the local network. To setup a port forward rule in firewall, use the below command:
sudo firewall-cmd --permanent --add-forward-port="port=40:proto=tcp:toport=80"

Here I've added a port forward rule where incoming traffic from 40/tcp port will be forwarded to 80/tcp port. But for this rule to work properly, the port referred in toport= option should be allowed in the firewall.
Rich rule in firewalld
Rich rules are more advanced and complex as compared to standard rules. They allow you to create rules based on IP Addresses, ports, MAC Addresses, and more.
IP Address based rich rule
Use below syntax to add a rich rule for IP Address in the firewall:
sudo firewall-cmd --permanent --add-rich-rule='rule family="ipv4" source address="192.168.1.11" accept'

This rich rule allows all incoming connection requests from 192.168.1.11 IP Address. Option accept in the command instructs the firewall to allow all incoming connection requests. Similarly, If you want to deny all incoming traffic from a specific IP Address, use drop option instead of accept in the command.
MAC Address based rich rule
Rich rule is not limited to only IP Address. You can use MAC address to create a rule. Use below syntax:
sudo firewall-cmd --permanent --add-rich-rule='rule family="ipv4" source mac="3a:7d:6f:bc:5a:70" protocol value="tcp" drop'

This will drop all the incoming traffic from specified MAC address. Pay attention to the syntax of rich rule command as there are lots of single quotation marks and double quotation marks that could cause syntax errors if missed or added unnecessarily.
Remove rule in firewalld
When it comes to removing a rule in fierwalld, It's both simple and frustrating. Unlike other firewalls like ufw, you cannot remove a rule from firewalld using rule index number because there are none. I don't know why they make it this way but you have to write the entire rule with remove option instead of add to get rid of that rule. You have to list the existing rules first, copy the appropriate rule, and construct the firewalld command as below:
sudo firewall-cmd --permanent --remove-rich-rule='rule family="ipv4" source address="192.168.1.11" accept'

Here I've removed the rich rule that was added earlier for an IP Address. To remove the rule, command is the same as for adding the rule but with remove option instead of add option.
Rule removal syntax is simple. Use the same command you used to create the rule, but replace add with remove option. Pasting the whole rule in the command could be frustrating though.
Change interface in firewalld
All the firewall rules specified for a zone will apply to the interface card attached to that zone. Network traffic flow on this interface card will be based on Its specified zone rules. To check what interface is currently assigned to the default zone, use below command:
sudo firewall-cmd --list-interfaces

In my case, ens33 is an interface that is bound to the default (public) zone. You can use sudo firewall-cmd --zone=trusted --list-interfaces command to get interface bind to a specific zone (trusted zone in this case).
To bind another interface to the default zone, first you need to list all the available interfaces in the system. Use command:
ip link show #list interface cards
Now I know that my system have two interfaces lo and ens33. To switch from ens33 (which is currently bound to default zone) to lo interface (which is just a loopback address, I'm switching to it just for demonstration), use below commands:
sudo firewall-cmd --permanent --remove-interface=ens33
$
sudo firewall-cmd --permanent --change-interface=lo
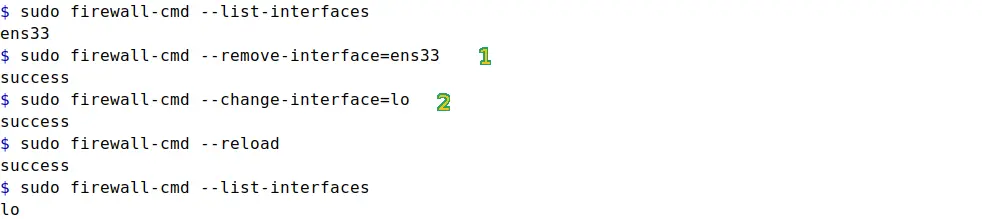
First command will remove the current binding of ens33 interface to the zone and second command will move the lo interface from any other zone, if bound, to the default zone. All the rules in the zone will now apply to network traffic of lo interface.
Remember that using --change-interface option will bind the specified interface to the specified zone but It'll also remove that interface from any other zone. So if you don't want to remove the interface from one zone and move it to another zone, use --add-interface option instead of --change-interface to bind new interface to a specified zone.
Create new zone in firewalld
Other than adding rules and managing existing zones, you can also create your custom zone and manage rules in it. Use this command:
sudo firewall-cmd --permanent --new-zone=protocolten

As in the image above, a new zone named protocolten has been added in firewall. Keep one thing in mind that using --permanent is necessary while creating a new zone.
Remove zone in firewalld
Firewalld also gives the user an option to remove a zone. Use below command:
sudo firewall-cmd --permanent --delete-zone=protocolten

As in the image above, I removed protocolten zone that we created in the previous section. Removing a zone also requires --permanent option. Just remember that you cannot remove built-in zones but only the zones you created manually.
Endnote
Firewalld is a feature-rich dynamic firewall management tool that is designed to be more flexible and user-friendly. In this article, I tried to touch on the main topics such as zones, port rules, service rules, and rich rules. But there is so much for you to explore. Use firewall-cmd --help or man firewalld to learn more about the tool or read the official documentation to deep dive into it.