Django is an open-source web framework based on Python. It can be very efficient in easing the process of complex and database-driven web applications. Behavior of this framework is very dynamic because a developer can create more with less code.
In this article, you'll learn how to set up a Django project from scratch, connect MySQL database with it, and serve the application to end users by utilizing a reverse proxy of Nginx to Gunicorn. This process is tested on Ubuntu 22.04 but with little changes, It'll work on other versions as well. You'll get to know how to configure Gunicorn, which is a WSGI HTTP server for running Python based applications, and connect it with the Nginx web server to handle traffic more efficiently.
Prerequisites
Before starting the Django setup, there are some prerequisites that need your attentions. As mentioned above, you'll need Ubuntu 22.04 LTS version (Desktop/Server) to get started. Your system must have Python3.8 or above installed. There are some essential system packages for this process. Use the below command to install them:
sudo apt update
$
sudo apt -y install nginx mysql-server libmysqlclient-dev python3-dev python3-pip python3-venv pkg-config
This command will install all the required packages and dependencies for Django project to work collectively with Gunicorn and Nginx without any issues. Package libmysqlclient-dev is necessary for MySQL server's interaction with Django application.
Creating MySQL user and configuring database
Now the first phase of this process starts with setting up MySQL database. By default, MySQL comes with test database, which is for testing purpose. Since our goal is to set up everything from scratch, we'll create a new user and database specifically for our project.
Run the below command to initialize MySQL server in CLI mode:
sudo mysql
This command will open MySQL CLI, where we need to perform some MySQL commands to create new user and database. To create a new MySQL user, use the following command:
CREATE USER 'myProc'@'localhost' IDENTIFIED BY 'user123';
With this command, myProc named new user will be created with user123 password. Here localhost represents that this user can only connect to MySQL server from localhost, which means the same machine where MySQL server is running.
Now we need to create a new database and assign privileges over that database to our newly created user. Use the below commands:
CREATE DATABASE myDatabase;
$
GRANT ALL PRIVILEGES ON myDatabase.* TO 'myProc'@'localhost';
$
FLUSH PRIVILEGES;
This command with create a new MySQL database by the name of myDatabase and grant all privileges on
this database to myProc user. Use quit; to exit MySQL CLI.
Configuring new Python virtual environment
After managing the database and moving towards the Django part, first we need to create and configure a new Python virtual environment. Let's create a new directory for our project:
sudo mkdir /project_dir
$
sudo chown -R pbxforce /project_dir && cd /project_dir
Above command will create a new project_dir named directory in root system and then initialize the terminal from that directory.
To create a new Python virtual environment, run the following command:python3 -m venv project_env
A new virtual environment project_env will be created. We need to install some Python packages in this virtual environment. To activate the new virtual environment:
source project_env/bin/activate
Python virtual environment will be activated. Run the below command to install the required Python packages:
pip install django gunicorn mysqlclient
Now that we have installed the required Python packages, It's time to start a new Django project.
Set up new Django application
Since we already installed Django in the previous step, we'll start a new Django application using the following command:
django-admin startproject my_app /project_dir
It will start a new Django project named my_app inside project_dir which is our project directory. Every Django project needs static directory that holds the static files for an application. To create this directory:
mkdir /project_dir/static
After creating static content directory and starting a new Django application, project_dir structure and content should look like this:
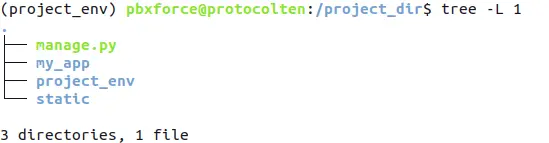
This should be your project_dir structure with all these files and directories inside it.
Modifying django application settings
After starting a new Django project, we need to make some changes in settings.py file and specify hostname
and database credentials. Use nano /project_dir/my_app/settings.py command to
open the file and make the following change:
ALLOWED_HOSTS = ['your-domain-name-or-ip', 'other-domain-name']
By specifying domain name or IP address in the ALLOWED_HOSTS = [] section, this Django application binds to that domain name or IP address. You can use multiple domains in the allowed hosts. If you are trying this process on a local server, then add 'localhost' or your private IP address in allowed hosts.
By default, Django comes with sqlite3 database. Since we are using MySQL in this process, scroll down to the database section in settings.py file and do the following changes:
 DATABASES = {
        'default': {
            'ENGINE': 'django.db.backends.mysql',
            'NAME': 'myDatabase',
            'USER': 'myProc',
            'PASSWORD': 'user123',
            'HOST': 'localhost',
            'PORT': '',
        }
    }
In this section, input your mysql details and credentials. If you have used different database and username, make changes here accordingly. Otherwise, you can just copy and replace it with database section in settings.py file.
Moving on to the next section in settings.py file, we need to define STATIC_ROOT variable to specify absolute filesystem path for static files. The path defined in this variable will hold all the static JavaScript, CSS, and image files. Scroll down to the static files section and add the following line:
STATIC_ROOT = 'static/'
After editing this section, settings.py file configuration is completed. Use Ctrl + x then press y to save and close the file.
Managing Firewall rules
If you are trying this method on a live server that has public IP address, make sure your firewall is allowing traffic over 8000 port. If not, use the below command to add a firewall rule:
sudo ufw allow 8000/tcp
$
sudo ufw reload
If you are using VPC server, then you may need to add allow rule for that specific port in the security group or firewall (depends on your VPC provider).
Finalizing Django application
Now that we have made all the required changes in the Django application, we need to create the tables in the database. Use the following commands:
python3 /project_dir/manage.py makemigrations
(project_env)$
python3 /project_dir/manage.py migrate
These commands are used to synchronize the database with model fields defined in the application. There are some default model fields defined for the admin panel and these fields will be synchronized with the database.
Apart from default model fields, there are also default static files for the admin panel. And since all our static files will be served from the path we defined in settings.py, we need to collect that static files from their base location to the static root path. For this purpose, use the command:
python3 /project_dir/manage.py collectstatic
This command will collect all the static files and place them inside STATIC_ROOT path directory.
Since we are talking about the admin panel, we also need to create a Django application user who can access the admin panel. For this purpose, run the below command:
python3 /project_dir/manage.py createsuperuser
Provide the details as required and in no time, your admin user will be ready. You can access the admin panel using your-domain-name/admin URL.
With this section finished, our Django application is ready to deploy. Run the below command to test it:
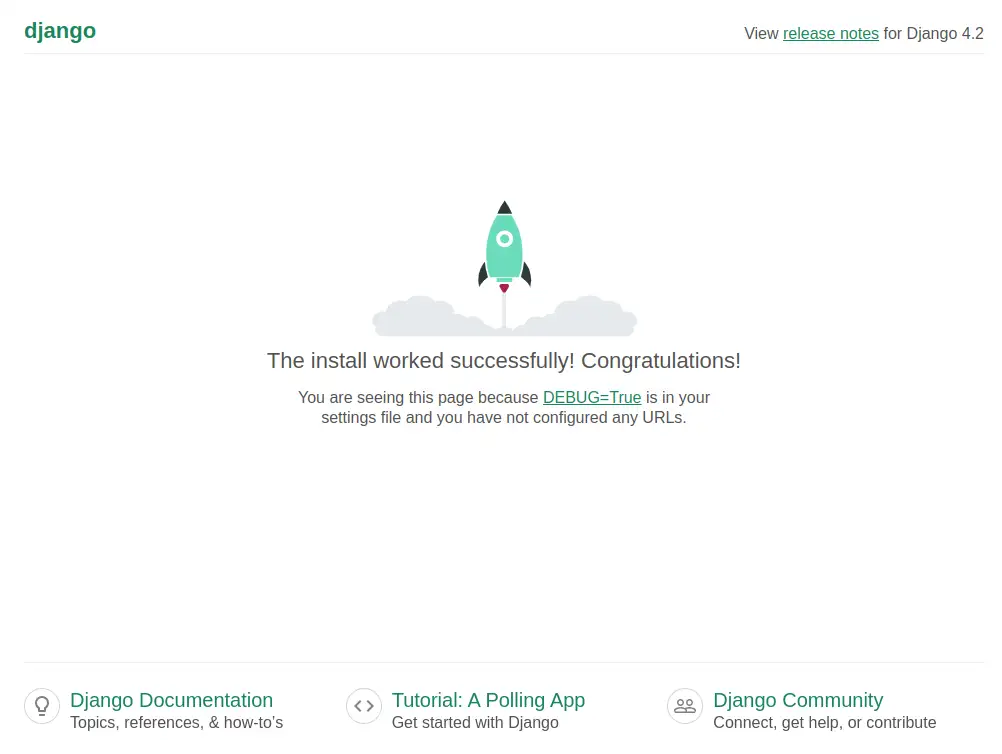
python3 /project_dir/manage.py runserver 0.0.0.0:8000
Now open your browser and try to access http://your-domain-or-ip:8000 URL. If everything
worked fine, you'll see something like the below image:
You can also check the admin panel page using /admin after your domain name or IP address.
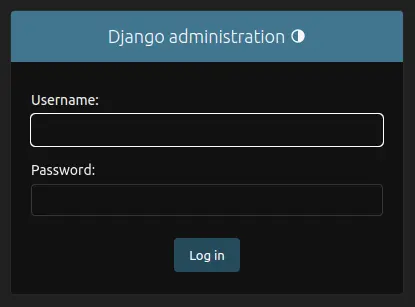
Input username and password created in the previous step (using createsuperuser) to access the admin page. When you are done exploring, press Ctrl + c from the terminal to stop the server.
Configuring gunicorn with django
In this part, we will configure gunicorn to make it work collectively with our Django application. But first, we need to check that gunicorn is able to establish a connection with our Django application. Use the following command to check:
cd /project_dir && gunicorn --bind 0.0.0.0:8000 my_app.wsgi
Now if the server is accessible by using IP address on port 8000, it means that gunicorn is working fine. You might notice that this time your Django application is not serving static files. That is because gunicorn does not serve static files by default and is primarily used to serve dynamic content. Static files will be handled by the reverse proxy server (i.e. Nginx).
Gunicorn configuration file
Gunicorn can be configured using a configuration file written in Python. It is one of the key feature of gunicorn among others like the concurrency model which utilize workers to handle multiple incoming HTTP requests simultaneously. Instead of specifying all these attributes as arguments while executing gunicorn command to start the server, we can write them in a configuration file. This configuration file can be loaded directly while starting gunicorn server.
Create and open a new Python file in the project directory using nano /project_dir/gunicorn.py and paste the following
code in it:
import multiprocessing

import os

chdir = os.getcwd()
bind = "0.0.0.0:8000"
workers = multiprocessing.cpu_count() * 2 + 1
wsgi_app = "my_app.wsgi:application"

accesslog = "access.log"
errorlog = "error.log"
This is a basic gunicorn configuration file written in Python. Let's break down each line:
- chdir will change the current directory to the specified directory before loading app.
- bind is used to initialize the WSGI server on specified IP and port number. Here we are specifying 0.0.0.0:8000 means the application can be accessed using the IP address on 8000 port. It should be in string format.
- workers is used to set number of worker processes for gunicorn server. multiprocessing.cpu_count() * 2 + 1 simply finding the CPU cores that are available for processing incoming requests and effectively suggests the number of CPU cores that can handle multiple HTTP requests concurrently.
- wsgi_app sets the WSGI application path. It should be in string format.
- accesslog and errorlog specifies the access log and error log path respectively. In our case, logs will be created in the project directory. Both should be in string format.
To check if there are any errors in your configuration file, run gunicorn --config gunicorn.py --check-config command.
If there is any error in the file, It'll be shown in the terminal, otherwise the output will be
null.
Now run this command inside the project directory to test the gunicorn server using configuration file:
gunicorn --config gunicorn.py
If everything worked fine, your gunicorn server will start with no output in the terminal. Open your browser and access your IP address on 8000 port, you'll see the Django development page. There are many more setting attributes that can be used in gunicorn configuration file. Check Gunicorn settings to know more about it.
Now we know our configuration file is working as expected, It's time to move to the next phase.
You can deactivate the Python virtual environment by typing deactivate in the terminal.
Creating gunicorn socket and systemd service
We can use the gunicorn as described above and configure Nginx reverse proxy on gunicorn bind address. But there is a more efficient way to manage this process where system resources will be utilized in a much better way. We will configure gunicorn as a systemd service so that it can start automatically after the system reboot.
First we will create a socket that will listen on UDS (Unix domain socket). Unix Domain Socket is a way of inter-process communication (IPC) whose primary goal is to establish effective communication between processes running on the same system. Check Inter-process communication for more detailed information. This socket will act as an endpoint for sending and receiving data to the UDS.
Execute this command in the terminal to create and open a new socket file:sudo nano /etc/systemd/system/gunicorn.socket
[Unit]
Description=Gunicorn UDS socket for django

[Socket]
ListenStream=/run/gunicorn-django.sock

[Install]
WantedBy=sockets.target
Press Ctrl + x and y to save and close the file. In contents of this file,ListenStream is used to specify UDS (Unix domain socket) and Its value /run/gunicorn-django.sock is path of the socket (which is a process). Here, we are establishing inter-process communication in the same system, that's why a file path is used instead of an IP address.
Since this socket (UDS process) will act as an endpoint for communication, we should bind the gunicorn server with it. If you are following the same parameters as described in the article, use the below command to replace 0.0.0.0:8000 with unix:/run/gunicorn-socket.sock:
sed -i 's/0\.0\.0\.0:8000/unix:\/run\/gunicorn-django.sock/' /project_dir/gunicorn.py
If you are using different parameters, then manually open the gunicorn configuration file nano /project_dir/gunicorn.py and do the following
changes:
bind = "unix:/run/gunicorn-django.sock"
With this change, gunicorn will communicate with a specified socket (inter-process communication) instead of an IP address.
Now use the below command to create and open a new service file:sudo nano /etc/systemd/system/gunicorn.service
[Unit]
Description=gunicorn daemon for Django
Requires=gunicorn.socket
After=network.target

[Service]
User=pbxforce
Group=www-data
WorkingDirectory=/project_dir
ExecStart=/project_dir/project_env/bin/gunicorn \
            --config gunicorn.py

[Install]
WantedBy=multi-user.target
Press Ctrl + x and y to save and close the file. Let's talk about service file content and attributes that you might need to change:
- Requires= option is used to specify the resource needed for this service to run. In this case, gunicorn.socket is must be running in order to start the gunicorn.service
- User= option specify the user that will run this service. In this case, pbxforce is a user in my system that will be running gunicorn.service. You might need to change the user according to your system.
- WorkingDirectory= option specifies the project working directory which in my case is /project_dir. You might need to change the path according to your system.
- ExecStart= option is used to provide the path of gunicorn executable from Python virtual environment. /project_dir/project_env/bin/gunicorn is the path of my gunicorn executable in Python virtual environment. You might need to change the path according to your system. And instead of passing multiple arguments, we used gunicorn configuration file specified by --config gunicorn.py argument.
sudo systemctl daemon-reload && sudo systemctl start gunicorn.socket gunicorn.service
It will activate the gunicorn.socket and gunicorn.service. To check the status of them, run the following command:
sudo systemctl is-active gunicorn.socket gunicorn.service
If both services appearing active then
gunicorn part is finished here. If the socket or service fails to start, use journalctl -u gunicorn.s* command to get gunicorn logs and find out the reason.
Configure Nginx reverse proxy to gunicorn
Now that gunicorn socket and service is set up as required, It's time to configure the Nginx reverse proxy to gunicorn. Use the below command to create and open a new Nginx configuration file:
sudo nano /etc/nginx/sites-available/myproject
server {
        listen 80;
        server_name domain-name-or-IP-address;

        location /static/ {
            root /project_dir;
        }

        location / {
            include proxy_params;
            proxy_pass http://unix:/run/gunicorn-django.sock;
        }
    }
Press Ctrl + x and then y to save and close the file. Some parameters in the above configuration file may be needed to be changed as:
- You should pass your domain name or IP address in server_name directive.
- root /project_dir; should be the path where your static files directory is located.
- proxy_pass directive is used for reverse proxy which is set to http://unix:/run/gunicorn-django.sock;
To enable the newly created configuration, use the below command that will create a soft link of myproject file in sites-enabled directory of Nginx:
sudo ln -s $PWD/myproject /etc/nginx/sites-enabled/
To verify if there are any errors in the Nginx configuration file, run sudo nginx -t command in the terminal. Now that Nginx
configuration is done, use the following commands to restart the server, manage firewall rules
to allow Nginx, and enable services and socket to auto-start after reboot:
sudo systemctl restart nginx
$
sudo ufw delete allow 8000/tcp
$
sudo systemctl restart nginx
$
sudo systemctl enable gunicorn.socket gunicorn.service nginx
Now open your web browser and access the Django application using IP address (this time without 8000 port). You should be able to access the application that is being served by Nginx with reverse proxy to gunicorn.
Conclusion
This is a very basic configuration of the Django application with Nginx server using Gunicorn. Lots of changes and modifications can be done according to the production environment. This article was focused on localhost but the same principle with little modifications will be applied if working with a live server. Using gunicorn as socket and service along with Nginx is a very effective method to serve the Django applications to end users.