Digital signatures are a crucial aspect of secure communication, ensuring message authenticity and integrity. GPG (GNU Privacy Guard) keys play a vital role in this process, enabling users to sign messages with their private keys and verify those signatures using corresponding public keys. This article explores the flow of how GPG key is used to sign the message from the sender side and how the recipient uses sender's public key to verify the message. Understanding the fundamentals is essential for maintaining data integrity and security in various communication channels, from emails to software distribution.
In this article, I'm using Ubuntu 22.04 LTS but you can use any Linux distribution, Windows, or Mac OS without any problem. To test this process, I have created two users on my system. User red will act as Sender and user blue will act as Recipient.
Install GPG command line tool
For Linux:Before running the command to install GPG utility, first check if It's already installed in your system using gpg --version command. If not installed, Use below command to install it:
sudo apt -y install gnupg # for ubuntu
$
sudo yum -y install gnupg # for centos/redhat
To install GPG utility tool in Windows, download the tool from their official page.
If you get the command not found error on executing gpg --version in CMD, you may need to add gpg tool in path using environment variables. Read article Create environment variables in Windows to know how to achieve this.
For MacOS:
GPG is typically pre-installed on macOS. If not, you can install it using the below command:
brew install gnupg
Sender's side
On user red, First we'll create a new GPG key pair consisting of the private key and a public key. This key will be stored in the GPG keyring, which is located in the .gnupg directory in the user's home. If this directory is present in your system, make sure to create in manually using mkdir ~/.gnupg command. Run the below command to generate a key pair:
gpg --full-generate-key
You will be prompted to input some information. For now, let's keep it simple and select default options. Make sure to use unique name when you are prompted for Real name: parameter, I'm using redUser for it. This will be the UID (user ID) of this key in the GPG keyring. You can leave the Email address: and Comment: parameter blank.
Next you'll be prompted to Set a Passphrase to protect your secret key. For now, keep it blank and complete the process. After successfully creating the GPG key, you'll get a similar output as the below image:

As it can be seen, a key with UID redUser is successfully created and saved in user's .gnupg directory.
Export Public key
GPG key pair that we have created is added in the keyring. This key will be used to verify the authenticity of message. In order to send the public key to recipient, we need to extract the public key while specifying UID from the keyring. Use below command to achieve this:
gpg --export -a "redUser" > public_key.asc
In this command, redUser is the UID associated with my key pair. You can use gpg --list-keys command to list all available keys from the GPG keyring along with their UID.
Sign the message
First create a simple message file with some content in it. Use the below command:
echo "it worked" > message.txt
It'll create a new file named message.txt. Check and verify this file that the content inside is same as you defined. Use cat message.txt command to check.
Now to sign the message, use below command:
gpg --clearsign -u "redUser" -o signed_message.txt message.txt
A new file signed_message.txt will be created in the current directory. If you see the content of this file, you will find the original message from message.txt file along with PGP Signature of the sender (which in my case is "redUser").
Sender's final part is to provide both public_key.asc & signed_message.txt file to the recipient. This key will be used to verify the authenticity of a message sent by the sender.
Recipient's Side
Using user blue, In this section, we as recipients will try to verify the signed message using the public key sent by the sender (user red).
Import the public key
In order to use the sender's public key, It must be imported into the GPG keyring. Use below command to import the public key file into recipient's GPG keyring:
gpg --import public_key.asc

If you get a similar output as the above image, sender's public key is successfully imported into your GPG keyring and is now ready to use for signature verification.
Verify the signature
Use below command to verify the message signature:gpg --verify signed_message.txt

As it can be seen in the image, signature has been successfully verified. It's a confirmation that the message is authentic and sent by the red user.
To resolve the "gpg: WARNING: This key is not certified with a trusted signature!" warning message, the recipient has to mark the sender's key as trusted. To achieve this, use below commands:
gpg --list-keys # to find the public key ID
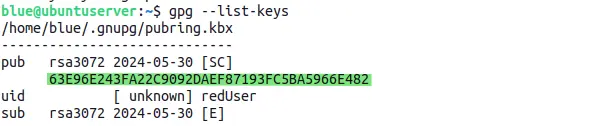
Copy the key ID of public key that you want to trust. Use below command to set the trust level. After executing the command, just type trust and then input 5 or 4 to ultimately trust the public key.
gpg --edit-key 63E96E243FA22C9092DAEF87193FC5BA5966E482
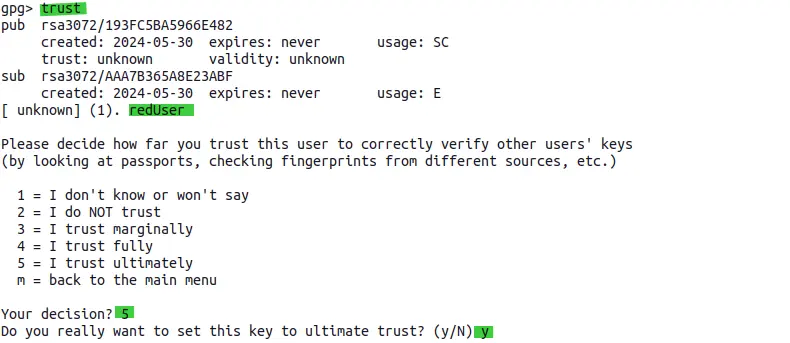
Now the new trust level has been set for the redUser public key. Try to run the verify signature command again:
gpg --verify signed_message.txt

As you can see, the signature has been verified as redUser and there is no warning this time which means the public key is fully trusted. You can set the trust level of any public key as per requirement.
Signature on encrypted message
Instead of just simple signature verification, you can also use the GPG tool to encrypt the signed message from sender side and then decrypt and verify the signature on the recipient side. For this process, the sender needs to have the recipient's public key that will be used for encrypting the signed message.
Execute these commands on respective sides to encrypt the signed message:gpg --full-generate-key # on recipient side, name this key blueUser$
gpg --export -a "blueUser" > blue_public_key.asc # on recipient side, send this key to sender
$
gpg --import blue_public_key.asc # on sender side
$
gpg --encrypt -u "redUser" -r "blueUser" -o encrypted_signed_message.gpg signed_message.txt # on sender side
gpg --decrypt encrypted_signed_message.gpg > decrypted_signed_message.txt
$
gpg --verify decrypted_signed_message.txt
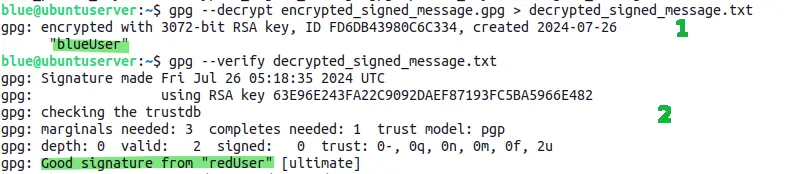
- First command will decrypt the encrypted message sent by the redUser (sender). blueUser (recipient) used It's private key to decrypt the message.
- Second command will verify the signature on the decrypted message. As it can be seen, the decrypted message contains a good signature from redUser (sender) which means the message is authentic.
Endnote
This way you can use GPG keys to sign and verify the messages along with encryption. Digital signatures are crucial for ensuring the authenticity and integrity of digital communications, especially in an age where cybersecurity threats are ever-present. By following the steps outlined, you can securely sign messages, verify signatures, and even encrypt communications for additional privacy.
Remember, the key to maintaining a secure digital environment is to manage your keys responsibly. Always make sure to back up your private keys and use secure methods to distribute your public keys. For more information on GPG and digital signatures, explore the official GnuPG documentation and other cybersecurity best practices to stay informed and protected in the digital landscape.