According to a survey done by W3Techs, Wordpress is used by 41% of all websites that are available on the internet. Wordpress is highly customizable, user-friendly, and easy to understand in terms of usability.
In this post, I'll be demonstrating how you can install Wordpress on LAMP Stack. LAMP stands for Linux, Apache, MySQL and PHP. Follow the below process to configure Wordpress.
Setup Wordpress on Ubuntu
This process is tested of Ubuntu 20.04 LTS but it'll work on version 18 or above. Before we start this process, you need to make sure that you have a working and configured LAMP System. Follow the process of Install LAMP on Ubuntu to learn about the LAMP Installation process.
Use the below command to install required system packages:sudo apt -y install wget rsync
Installing Latest Wordpress:
We will use wget to download the latest version of wordpress and tar command to extract the package. Use the below commands:
wget https://wordpress.org/latest.tar.gz
$
tar xfz latest.tar.gz
Creating MySQL Database and User:
First we will enable and start the MySQL service using sudo systemctl enable --now mysql
command. Now We will create a new database and user manually. Then we will
assign privileges to user over that database. Open your terminal and follow the commands
below to Create new MySQL Database and User with appropriate
permissions:
You should probably use mysql_secure_installation to set up your MySQL and root password before running any mysql commands. After setting up mysql, use the below command to launch mysql cli:
mysql -u root -p
CREATE DATABASE wordpress;
mysql>
CREATE USER 'johnwick'@'localhost' IDENTIFIED BY 'password';
mysql>
GRANT ALL PRIVILEGES ON wordpress.* TO 'johnwick'@'localhost';
mysql>
FLUSH PRIVILEGES;
- We have created new database named wordpress
- Then we created new local user named johnwick with the password set to password
- We granted all permissions to user johnwick over database wordpress.
Syncing Wordpress files with web server:
Instead of copying, we will use rsync command to synchronize files, while preserving their permissions, from wordpress directory (which we downloaded and extracted before) to web server location on /var/www/html.
sudo rsync -avP ~/wordpress/ /var/www/html/
Using rsync instead of simple cp or mv commands because It will copy the files to destination path with all the permissions and metadata intact.
After this, create a new sub-directory uploads inside wp-content directory. This directory will be used for uploading media files from wordpress.
sudo mkdir /var/www/html/wp-content/uploads
Managing files permission and ownership:
This is the most critical part of the process. This is what usually causes most of the errors. Web server required specific set of permissions and ownership over different files and directories. Use the below commands to set the appropriate permission and ownership:
sudo chown -R www-data:www-data /var/www/html/*$
sudo find /var/www/html/ -type d -exec chmod 755 {} \;
$sudo find /var/www/html/ -type f -exec chmod 644 {} \;
- First command will set file ownership for all files and directories to www-data, which is a system user used by web server.
- Second command will set appropriate permission only for directories within the project.
- Third command will set required permission only for files inside project directories and sub-directories.
Connect MySQL database to wordpress:
In this part, we will attach MySQL database wordpress to our website.
Go to your wordpress website directory using cd /var/www/html command and copy the wp-sample-config.php file and name it wp-config.php by using the below command:
sudo mv wp-config-sample.php wp-config.php
Now open the file using sudo nano wp-config.php and insert your database details. It includes your database name, database user and password, and database host.
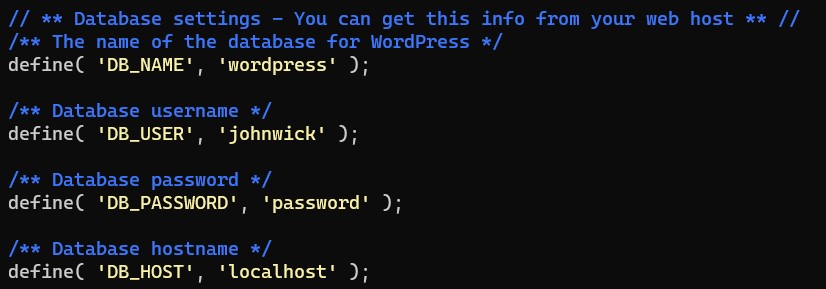
Now your MySQL database is connected to wordpress. Use sudo systemctl enable --now apache2 to start your Apache web server. Go to your ip-address and you will see the wordpress welcome page.
Fixing permalinks issue:
This is a very common problem where we cannot change the structure of permalinks. Only permalinks that consist of post id are working. If we try to use custom or slug-based permalinks, then our wordpress will give us an error.
To fix this issue, simply use this command:sudo sed -i 's/AllowOverride None/AllowOverride All/g' apache2.conf
By default in the Apache web server's configuration, AllowOverride is set to None. It simply means that the .htaccess file is disabled if present in that directory. By using the command above, we enable the .htaccess file.
Run ls -a /var/www/html/.htaccess command to check whether you have .htaccess file or not. If it's already there, then copy the below code and paste it into that file. If there is no file present, then create one using sudo nano .htaccess command and paste the following code:
<IfModule mod_rewrite.c>
RewriteEngine On
RewriteRule .* - [E=HTTP_AUTHORIZATION:%{HTTP:Authorization}]
RewriteBase /
RewriteRule ^index\.php$ - [L]
RewriteCond %{REQUEST_FILENAME} !-f
RewriteCond %{REQUEST_FILENAME} !-d
RewriteRule . /index.php [L]
</IfModule>
You also need to make sure that htaccess file is readable by apache webserver. Server require read and write permission on .htaccess file but for security reasons, we will assign read only permission to web server. You have to manually edit the file for future changes. Run the below command to change ownership and permission:
sudo chown root:www-data .htaccess
Now enable mod rewrite using sudo a2enmod rewrite command and restart
the server using sudo systemctl restart apache2 command
and your custom permalinks should be working.

