Containerization is a way of packaging an application along with all of Its required libraries, code, and environment into a container. This container can now be used on any other system to run the application without worrying about the dependencies and libraries.
Containers are portable images that can run on any system that supports Containerization tools such as docker or podman. This way the deployment of application can be much more reliable and efficient across various testing or production environments.
In this article, I'll be using Ubuntu 22.04.2 LTS server version of Linux but the same principle is applied on other distributions.
Install docker
Before starting with the installation process, first you need to make sure there are no conflicting packages installed in your system. Official Docker documentation suggests that these conflicting packages that come in distribution repositories must be uninstalled before installing the official Docker engine. Use below command in your terminal to remove these packages if installed:
for pkg in docker.io docker-doc docker-compose docker-compose-v2 podman-docker containerd runc; do sudo apt purge $pkg; sudo apt autoremove; done
This command will purge all the conflicting packages from the system. Instead of using repositories, we'll manually install Docker and other required dependencies using deb packages.
To install Docker engine packages, follow below steps:- Go to Docker download
- Select your ubuntu release version codename. If you are not sure what it is, run
cat /etc/os-releasecommand. For Ubuntu 22.04.2 LTS, release version codename is Jammy. - Select the following options: pool > stable > amd64/arm64.
- Now download latest version of these tools: containerd.io, docker-buildx-plugin, docker-ce-cli, docker-ce, docker-compose-plugin. Only download the .deb packages.
sudo dpkg -i <.deb-package-path>
Installing all these packages will make your system docker-ready. You can remove the .deb package files.
Permission denied for non-root user
If you try to run any Docker command as a non-root user, most probably you'll get permission denied error. To get rid of this error and use docker as rootless, you have to add your appropriate local user in docker group. Use the below command:
sudo usermod -aG docker red
This command will add user red in secondary group docker. This user can now use Docker without any restrictions.
Essential docker commands
Before we start diving deep into docker, you must know these essential docker commands. We'll use these commands throughout this article multiple times.
docker imagesList all container images from the library.docker psList all running containers.docker ps -aList all running and stopped containers.docker start<container-id/name>: Start a stopped container.docker stop<container-id/name>: Stop a running container.docker inspect<container-id/name>: Get information about docker objects such as image or container.docker pull<container-id|image-id>: Download container image from default repository.docker run<image-id/name>: Run a container from specified image. Image will be downloaded from the default repository if not available locally.docker rmi<image-id/name>: Remove image from local library.docker rm<container-id|image-id>: Remove a stopped container.
You must know about all of the commands listed above because we'll be utilizing them multiple times in this article. We'll also explore more docker commands and features in the next section.
Run new container
There are various ways to run a docker container based on the user's interaction with it. Before running your first docker container, first you need to know the identifier of that image. Use this command to list all container images that are present in the system:
docker images

Since we just set up Docker, there will be no container image present in the local library. So we'll pull a busybox container image from default Docker hub repository and then run a container from this image.
docker pull busybox:latest
$
docker run busybox:latest echo "Hello, world!"

- This command will download busybox container image.
- This command runs a new container from a specified image. Hello, world! message at the end verifies that It worked succssfully.
You might have noticed that I used latest while specifying image name. It's a tag mapped with an image used to target that particular image. Very useful when we are specifying images by name instead of IDs and there are multiple images of the same name.
Run new container in interactive mode
We used a very basic type container in the previous section that printed the passed message and stopped automatically. What if we want to run a more purposeful container that keeps running until stopped manually? We'll run alpine container which is just another Linux distribution but very lightweight. Use this command:
docker run -it --name alpine_linux alpine:latest
Above command will look for alpine container image in the local library. Since the local library is empty by default, the Image will be downloaded from Docker hub repository and then run the container using that image.
- -it specifies interactive mode and using this option will drop the user in default shell of the container.
- --name attribute used to set the name of container which is useful for further container management like stopping or inspecting.
Press ctrl + d to stop the container and exit Its shell.
Start existing container
By using the command listed in essential docker commands, an existing stopped container can easily be started again. There are various options that you can use while starting a container. First, you need to list all the available containers to get the container's name. Now suppose you want to start a specific container but not in interactive mode, then use this:
docker ps -a
$
docker start alpine_linux

- This command will list all the running and stopped containers. In this list, there is a container named alpine_linux that we started in the previous sections.
- It'll start the alpine_linux container.
Use docker ps command to list all running containers and verify that your container has been started as expected.
Start existing container in interactive mode
You can also access the shell of a container by starting it with appropriate options. Use the below command:
docker exec -it alpine_linux /bin/sh
It will start the alpine_linux container in interactive mode. /bin/sh specifies the command to be executed in the container. In this case, It's launching a sh shell (default in alpine linux) within the container. You can use docker stop alpine_linux to stop the specified container.
Run container with persistent storage
By default, all the data is removed when you remove the container. But if you need to preserve the data, you need to create a persistent storage and attach it to the container. Use below command:
docker volume create host_vol
$
docker run -it --name alpine_1 -v host_vol:/container_vol alpine:latest
$
echo "it worked" > /container_vol/file.txt
$
docker rm alpine_1
$
docker run -it --name alpine_2 -v host_vol:/container_vol alpine:latest
$
cat /container_vol/file.txt
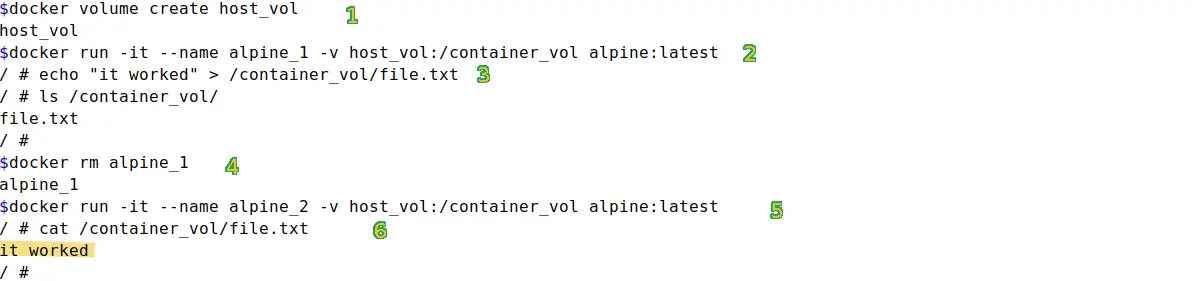
- This command will create a new host_vol named volume in host system.
- It will launch a new container alpine_1 and attach the host_vol directory with container_vol in the root file system of container.
- This command will create a new file file.txt in the container inside container_vol directory with some content. Exit the container by pressing ctrl + d buttons.
- It will remove the alpine_1 container from the host system.
- This command will create a new alpine_2 named container while attaching the host_vol volume on host system with container_vol on alpine container.
- It will check the content of file.txt file in container_vol directory.
Content of file.txt in alpine_2 container verifies that the alpine_1 container data was preserved even after removing that container.
You can use any drive or directory on the host system and sync it with the container. So instead of creating volume using docker, you can share any directory from the host system with the container. Use:
docker run -it --name alpine_1 -v ~/my_data:/container_vol alpine:latest

I created a new directory my_data in host system. Inside it, create a file named test.txt with some content in it. Then attached this directory to container_vol in alpine container. After running the container, the output printed by cat command verifies that the host directory is shared with the container as expected.
Remove docker volume
Creating a docker volume and using it as persistent storage is an effective way to preserve container data. To remove an existing docker volume, use the below commands:
docker volume ls
$
docker volume rm host_vol
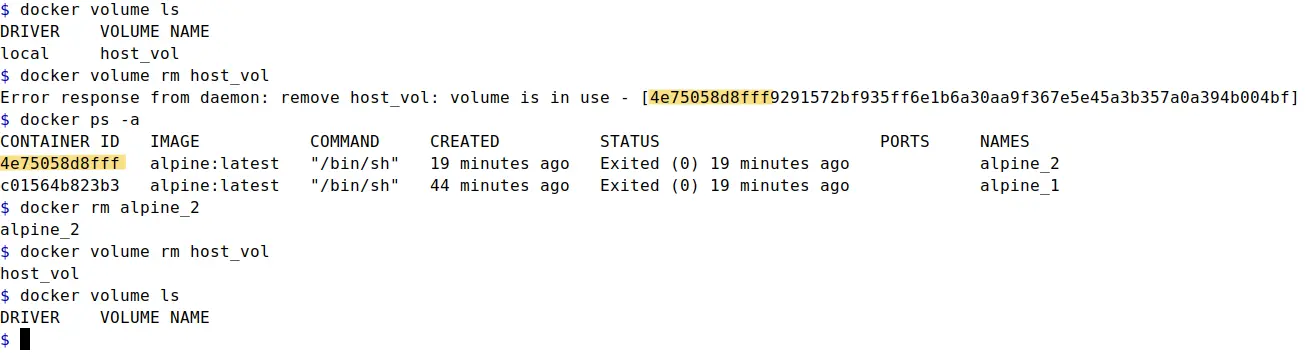
- To remove a docker volume, you need to know Its name. This command lists all docker volumes in the system.
- It will remove the specified docker volume from the system.
As seen in the image above, I got an error while removing the docker volume. Due to the specified volume being used in a container, docker was unable to remove it. So to do so, you have to remove the corresponding container first using docker rm command.
Run nginx container
Let's pull Nginx web server image from the Docker repository and run a container from it. Use below command to download latest Nginx container image:
docker pull nginx:latest
It will download the Nginx container image. Run docker images command to verify that the image has been downloaded. Now to run the container most conveniently and effectively, use:
docker run -d --name nginx_server -p 8080:80 nginx:latest
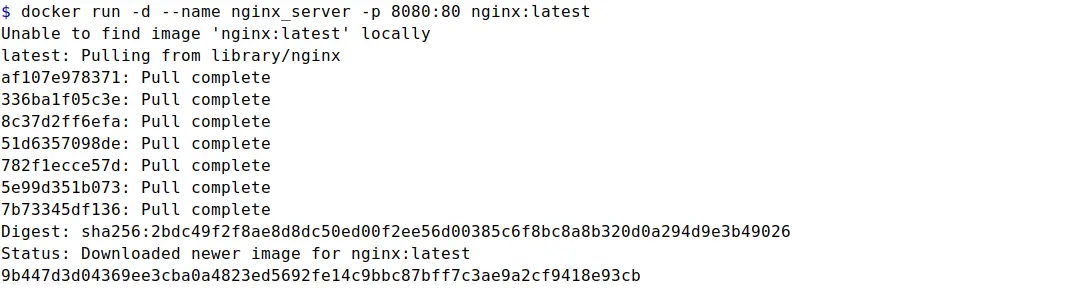
- -d option will run the continer in the background.
- --name option used to set the container name.
- -p option will map the host port with container port. In this case, host port 8080 traffic will be redirected to port 80 on the container.
You can use docker ps command to verify that nginx_server container is running. Use below command to check that the host-container ports are mapped correctly and traffic is being redirected as expected:
curl -s localhost:8080 | grep -o '<h1>[^<]*</h1>' | sed -e 's/<[^>]*>//g'

Nginx container is working just fine. Traffic is redirected from host port 8080 to port 80 on the container as mapped. Docker manipulates iptables rules to provide network isolation. Two custom iptables chains named DOCKER-USER and DOCKER are installed. It ensures that incoming packets are always checked by these two chains first. These chains are part of the FORWARD chain. Rules are implemented based on chains priority: DOCKER-USER > DOCKER > FORWARD.
Long story short, if you mapped a host port with container port, that specified host port allow traffic. It does not required any allow rule in firewall to forward traffic. Even if you explicitly deny that port in the host system firewall, traffic will still be allowed from that host port to container port due to Docker's iptables manipulations. Take a look at packet filtering firewalls to get more insight about this behaviour.
Run Nginx container with persistent logs storage
It's one of the best practices to attach persistent storage for syncing nginx logs using this method. Apart from preserving logs, It's much easier and more convenient to access nginx container logs. Use below commands:
mkdir ~/nginx_logs
$
docker run -d --name nginx_server -p 8080:80 -v ~/nginx_logs:/var/log/nginx nginx:latest
nginx_logs directory in users home will now be synced with /var/log/nginx directory in container. Nginx logs will be preserved on the host system even after stopping or removing the container.
Copy files in/from container
Perserving or syncing data between host and container is great but sometimes you just need a simple method to copy files in or from the container. This is where Docker cp commands come in handy. To demonstrate this, I'll create index.html file in the host system and replace it with the sample file in the Nginx container. Use below commands:
echo "<h1>This is Nginx web server running on Docker container</h1>" > ~/index.html
$
docker cp ~/index.html nginx_server:/usr/share/nginx/html
$
curl -s localhost:8080 | grep -o '<h1>[^<]*</h1>' | sed -e 's/<[^>]*>//g'

By successfully copying the new index.html file from the host to the container, we replaced the Nginx web server homepage. This method is very useful when the goal is to quickly copy or retrieve the files from or to the container.
Retrieve files from container
To retrieve files from the container, use the below command:
docker cp nginx_server:/usr/share/nginx/html/index.html ~/retrieve_test
$
cat ~/retrieve_test

- First command will copy the index.html file from the container and save it in the user home directory under retrieve_test named file.
- Second command will verify that retrieve_test file is present at specified locations and contains the same content as index.html file in the container.
Endnote
The development, deployment, and management of software has been completely transformed by Docker. Modern software infrastructure is still being shaped by its containerization technology, which makes applications more effective, portable, and scalable in a variety of settings. Docker's influence on the technology sector is still significant even though it's still developing and advancing in the field of containerization.