This article is all about SELinux. It's a security component that protects Linux systems from unauthorized access and malicious software. SELinux stands for Security-enhanced Linux, which is a kernel module used to implement security mechanisms and mandatory access controls. Various Linux distributions come pre-installed with SELinux.
Prerequisite
I'll be using CentOS 7 in this tutorial. You can use the latest versions of CentOS or even Redhat Linux because the underlying concept is same. By default, SELinux is in Enforcing mode, which means It's active.
SELinux goes beyond basic Access control that is based on user and group in Linux. It implements Mandatory Access Control (MAC) that may overrule the basic Access control mechanism while implementing more strict security policies. SELinux uses context to assign security attributes to objects like files and processes. These objects are labeled with a specific SELinux context that determines their access level within the system.
Before getting started with SELinux, you need to make sure that your system has policycoreutils-python package installed. To check, run the below command:
sudo yum list policycoreutils-python
Usually the package comes pre-installed in Fedora distributions. But if you are using the minimal version then you might need to install it manually.
sudo yum -y install policycoreutils-python
This package will install semanage, a CLI utility, that will be used to manage SELinux policies. Many other commands interact with SELinux policies in their way. We'll talk about them in detail.
SELinux modes
SELinux works based on modes. There are 3 possible modes. To check the current mode of SELinux, run this command:
getenforce

- Enforcing mode, as the name states, actively enforces the security policies that are defined in the SELinux policy configuration. Access will be granted or restricted based on the SELinux context of a particular object. When an action violates the current defined SELinux policy, appropriate object access is restricted and an audit message is generated to log in the policy violation.
- Permissive mode specifies that SELinux is currenty in monitoring mode. When this mode is activated, SELinux does not implement any defined security policies. Instead, It logs all those policy violations that could have been blocked in Enforcing mode. It helps the System Administrators to understand SELinux policies and how these violations could affect the system.
- Disabled mode completly disables the SELinux. When in Disabled mode, there is no policy implementation or monitoring. The system operates under basic Access control instead of Mandatory Access Control.
Change SELinux mode to Permissive
sudo setenforce 0

Ofcource you need sudo privileges to change SELinux mode. If you check the status now, SELinux will be in Permissive mode.
Change SELinux mode to Enforcing
sudo setenforce 1

Change SELinux mode toDisabled
Disabling SELinux requires making some changes in the configuration file. Use the below command to open Its configuration file and make the following changes:
sudo nano /etc/sysconfig/selinux
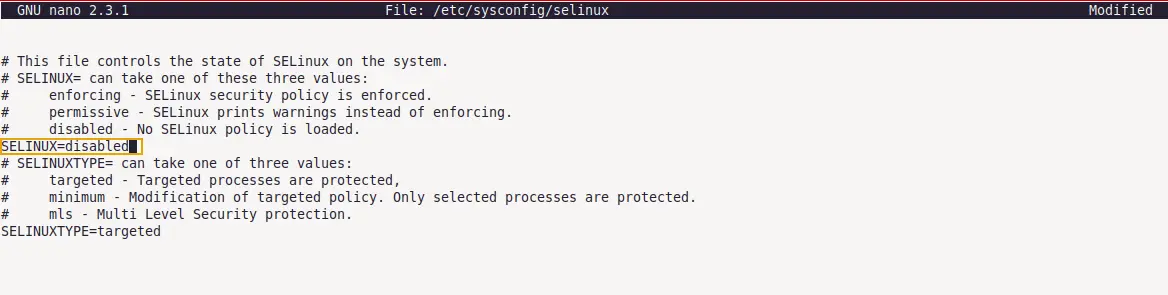
In the configuration, change the SELINUX= value to disabled and save the file. Reboot the system to make the changes effective. After reboot, run getenforce command again to check the current SELinux mode.

This way you can change the SELinux modes. Just remember that modes changed using setenforce command will not persist across reboot. To make changes permanently, define SELinux mode in the configuration file. For the sake of security and this article, let's switch the SELinux mode back to enforcing in the SELinux configuration file.
SELinux context mapping
SELinux context of an object defines whether access to a particular resource should be granted or restricted. In Linux, every directory, file, and process has its respective context. Mandatory Access Control (MAC) is based on this context. Basic syntax of SELinux context is:
[SELinux-user] : [SELinux-role] : [SELinux-type] : [Senstivity range]
Check SELinux context
To check the SELinux context of a process running in the system, use the below command:
ps axZ|grep httpd

To check SELinux context of an object, first create a new file using touch test_file command and run the below command:
ls -Z test_file
 Lets break down what each block of file context means:
- unconfined_u is SELinux-user associated with this file. In the Linux system, each local user is mapped with SELinux user. In my case, pbxforce, which is my local user, mapped with unconfined_u SELinux user. There are different types of SELinux users and they all have different access levels. Run
id -Zcommand to check the SELinux user mapped with your current local user. unconfined_u SELinux users have less strict policy restrictions than some other SELinux users. - object_r is SELinux-role associated with this file. Role defines the actual SELinux context and an object operates based on this role. You can think of them as a set of SELinux access rights that are assigned to a particular object. object_r is the kind of default role that is assigned to most objects and processes. Roles can be changed by altering the SELinux policy configuration.
- user_home_t is SELinux-type associated with this file. SELinux type contributes to defining the permissions and access rights for an object based on its purpose. So changing the SELinux type of an object can alter the permissions and access rights for that object. Here user_home_t defines that the file belongs to the user home directory and appropriate permissions and access rights will be implemented.
- s0 is Senstivity level (also known as MLS/MCS Level) associated with this file. SELinux Sensitivity is represented by different levels. These sensitivity levels are used to categorize data based on their security requirements. s0 is the default sensitivity level and defines that the data is less sensitive. SELinux uses these sensitivity levels to implement the required security for an object. An increasing number in sensitivity represents more sensitive data. By default, the sensitivity level range is s0-s15.
To know more about SELinux users, run sudo semanage user -l command. It will provide you the list of all SELinux users and their appropriate roles within the system.
Change SELinux context of object
We'll use semanage tool to manage the SELinux context of an object. It allows to modify SELinux context which will affect the permissions and access controls of that object. Sudo privileges are required to modify the SELinux context using semanage command.
Before we proceed forward with changing the context, first check the default SELinux policies being enforced for current user. Use the below command:
sudo semanage fcontext -l|grep pbxforce

This command will print the default SELinux context enforcing for my current user (pbxforce). Objects created inside my user directory will have the user_home_t context type by default. We are going to change this attribute using semanage command.
To change the SELinux context, use the following commands:
ls -Z test_file
$
sudo semanage fcontext -a -t mnt_t /home/pbxforce/test_file
$
sudo restorecon -Rv /home/pbxforce/test_file
$
ls -Z /home/pbxforce/test_file

As it can be seen in the image above, SELinux type of file has been changed. These commands work as follows:
- semanage command adds new SELinux type in the mapping SELinux policy.
- restorecon command is used to restore the changed SELinux type from policy.
- ls -Z command is used to check and verify the previous and changed SELinux type.
Make sure you replace the pbxforce with your local user and always pass the absolute link of an object while restoring the SELinux context because relative links do not work.
Remove SELinux context of object
Using semanage with option -a will permanently update the respective object context. To delete the context of an object and revert to the original/default context, use the below command:
ls -Z test_file
$
sudo semanage fcontext -d -t mnt_t ~/test_file
$
sudo restorecon -Rv ~/test_file
$
ls -Z test_file

We used semanage command with option -d that removes the current SELinux context type (directed by '-t' option) from the file and revert to the original/default context type.
Restore SELinux context of object
There is another command named chcon that is used to change the SELinux context of an object without altering the SELinux policies. To change the SELinux context using this command, use:
sudo chcon -t ~/test_file

As you can see in the image above, there is no need to use restorecon command like we used with semanage. Because chcon does not make any changes in the SELinux policy, It only changes the SELinux context of specified object.
But one thing you must know that changes made using chcon command does not survive file system relabel. So if you want to restore the original context of an object, there is a where restorecon command comes in handy. Use:
sudo restorecon -Rv ~/test_file

As shown in the image above, SELinux context type has been restored to the original state. Just remember that semanage command makes changes directly into the SELinux policies and then restorecon command is used to apply that changed context to an object. This is why restorecon command will restore the most recent context as the original context.
If you are just interested in knowing the original context instead of changing it, you can use the below command:
matchpathcon -V ~/test_file

As shown in the image above, verified means the context of file is original. This way you can know about what is the current SELinux context of an object and what it should be.
SELinux port definitions
In SELinux, ports are mapped with a specific SELinux type which is based on policy definitions. When a process or service is mapped with a specific port in SELinux policy, that service/process can utilize the port for network communication. Other ports are restricted and cannot be used by the service/process unless specifically mapped with it in the SELinux port definitions policy.
Check SELinux port definitations
To check the list of all services/processes and their mapped ports in the SELinux port definitions policy, run the below command:
sudo semanage port -l
Output by this command will be a list of all the services/processes mapped with their respective ports in SELinux port definitions policy. For better understanding, let's check http ports in this list that are used by various web servers. Use the below command:
sudo semanage port -l|grep http

- http_port_t is the SELinux context type of service.
- tcp is the port type.
- 80, 81, 443, 488, 8008, 8009, 8443, 9000 ports are mapped with listed SELinux context type.
All of these tcp ports marked in the image above are mapped with http service in SELinux port definitions policy and can be utilized by the web server. A port must be mapped with the respective SELinux context type in the SELinux port definitions policy for the service to utilize that port.
Change SELinux port definitations
Let's say you want to run your HTTP services on port 8110, which is not mapped with the SELinux context type of the Apache web server.
First install the Apache web server using sudo yum -y install httpd command and verify server is working on default port. Use the below command:
curl localhost:80

As you can see in the image above, web server successfully connected on port 80. That is because SELinux policy allows the HTTP web server access on this port.
To use port 8110 instead of the default port, it has to be defined in the Apache configuration file. Use the below command:
echo "Listen 8110" | sudo tee -a /etc/httpd/conf/httpd.conf
Now that the Apache web server is pointed to 8110 port, users must be able to connect to the web server on this port, right? Reload the web server using sudo systemctl reload httpd and run the below command to check web server response:
curl localhost:8110

As you can see in the image above, web server refused connection on port 8110 even though we pointed the web server towards this port in the configuration file. That is because this port is not mapped with SELinux context type of HTTP service.
To use port 8110 for HTTP, It must be mapped with the appropriate SELinux context type in the SELinux port definitions policy. Use the below command:
sudo semanage port -a -t http_port_t -p tcp 8110
- http_port_t is the SELinux context type of HTTP service that we want to modify.
- tcp is the port type.
- 8110 is the port number that we want to add to the list.
curl localhost:8110

This time, as shown in the image above, connection to the web server can be established over port 8110. It was only possible after the port 8110 was added to the list of SELinux HTTP services mapped ports.
Remove port from SELinux mapping list
To remove the port from SELinux port mapping policy, semanage command can be used as:
sudo semanage port -d -t http_port_t --proto tcp 8110

As you can see the output, port 8110 has been removed from HTTP-mapped ports in the SELinux port definitions policy. Used -d option for removing the port and --proto option for specifying the protocol, which in our case is tcp.
Preserve SELinux context
In Linux filesystem, different directories have different SELinux contexts. Moving or copying an object from one directory to another might change the SELinux context of that object.

As it can be seen in the image above, SELinux context of file has been changed automatically after copying the file to another (/mnt) directory. Now the file is inside /mnt directory it'll have the SELinux context of this directory.
To preserve the SELinux context while copying an object, use below command with the specified options:
sudo cp --preserve=context test_file /mnt

As you can see, file context is same after copying it to another directory. In the command, i used --preserve=context option to preserve the SELinux context of the file.
Endnote
SELinux is a sensitive module. We only used semanage command in this article. Be careful with this command because it directly make changes in the SELinux policy. There are also booleans in SELinux that are responsible for controlling specific aspects of policies and enabling/disabling certain functions without changing the SELinux policy directly. You can get the list of SELinux booleans using sudo semanage boolean -l command.