This article is about AWS RDS master and slave replication. I'll explain how to setup cross-account (from one AWS account to another AWS account) AWS RDS master and slave servers. This article is focused on AWS RDS but If you are looking for on-premise setup, then follow How to setup on-premise MySQL master and slave server article.
I'll be using MySQL 5.7.43 database from AWS RDS for both master and slave servers. Since we are provisioning AWS resources for testing purposes, we will use minimal computing resources under the free tier. I have two AWS accounts, one is for MySQL master server and second is for MySQL slave server. My system OS is Linux Mint where I have MySQL 8.0.34 server version installed on it. You can use any OS or MySQL version on your base system.
Create master and slave servers on AWS accounts
In this section we'll launch master and slave servers on AWS accounts. We will use MySQL server for the purpose. To create a new database instance for master server, log in to your first AWS account, search RDS in search bar, and click on Create database button from RDS page:
RDS > Create databaseA new page, similar to below image, will open where we will select options for initial configuration of our master server:
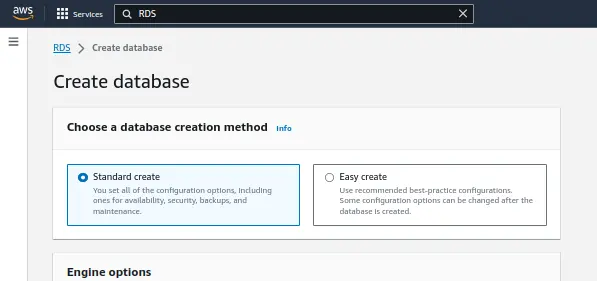
From this page, we don't need to change much because default selections are pretty much we need for our project. Options that need to be changed are explained below:
- Engine type: Select MySQL from the options.
- Engine Version: Select MySQL 5.7.43 from the dropdown list of available version.
- Templates: Select Free tier because we are provisioning minimal resources for testing purposes.
- DB instance identifier: Set name of this
database instance to
master-db. You can name it anything you like but for the sake of this tutorial, try to follow the naming conventions used in the article. - Credentials Settings: This is where we'll create a new MySQL master user. Our master username will be admin with password set to Password123.
- Instance configuration: Since we are going with minimal configuration, select db.t2.micro from Burstable classes option under DB instance class.
- Public access: Under Connectivity, set this option to Yes. Since our slave server will be on another AWS account, we need our master database to be publicly accessible.
- VPC security group (firewall): Under
Connectivity, select Create
new to move forward with new security group that will be attached to this
database instance. In the next option under New VPC security group name, type
master-db_secGroupwhich will be name of this security group.
These are the only options that need to be modified. Now click on Create database button to create the database with selected options. The database creation process might take some time.

As you can see in the above image, "master-db" MySQL instance has been created and started successfully in the first AWS account. Now perform this same operation in your second AWS account. MySQL server deployed on the second AWS account will act as a slave server. Set the name of your slave server to "slave-db" while keeping the rest of the settings are unchanged.
Configure MySQL master server
In order to configure the MySQL server as a master server, first we need to access it. We'll use the AWS endpoint attached to this server to get the public IP address of this MySQL server. To get the endpoint, click on master-db and copy value of Endpoint option under Connectivity & security as shown in below image:
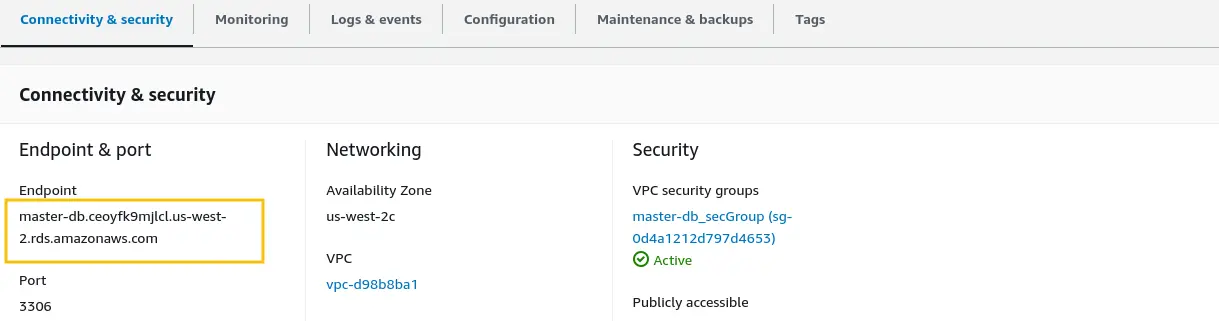
Now that we have acquired the endpoint of our MySQL server, run the below command to get the public IP address of this MySQL instance:
nslookup master-db.ceoyfk9mjlcl.us-west-2.rds.amazonaws.com
Replace the master-db.ce... with your server endpoint address. After executing the command, you'll see the public IP address as shown in the below image:
 Now run the below command to access MySQL CLI of this instance:
mysql -u admin -h 35.160.2.201 -p
Keep one thing in mind that you can only access this MySQL server from your current host system where your AWS account is logged in. That is because newly created security group restricts the Inbound access strictly to your host IP address.
MySQL server CLI will be launched. Now we need to run some SQL commands to configure this server as the master server. Use below commands to achieve this:
CREATE USER 'slaveUser'@'54.69.26.174' IDENTIFIED WITH mysql_native_password BY 'Password@123';
mysql>
GRANT REPLICATION SLAVE ON *.* TO 'slaveUser'@'54.69.26.174';
mysql>
FLUSH PRIVILEGES;
mysql>
SHOW MASTER STATUS;
mysql>
SELECT user,host from mysql.user;
Above commands will create a new MySQL user slaveUser with appropriate replication permissions. Make sure to replace 54.69.26.174 with your slave server public IP address.
- SHOW MASTER STATUS;
command will print the details of the master server, along with changelog file name and log
position, in the terminal. See image below:
 Note down the File and Position values, we'll need them while configuring
slave server.
Note down the File and Position values, we'll need them while configuring
slave server.
- SELECT user,host ... After executing
this SQL command, you'll see a similar output:
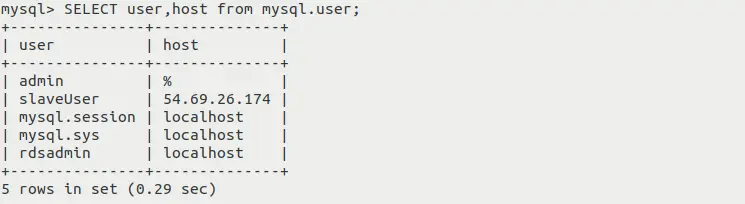
As you can see in the above image, user slaveUser is mapped with 54.69.26.174 host, which means that the specified user can connect to this master server only if the connection request is originating from this specified IP address. It is good from security perspective.
Configure MySQL slave server
Slave server configuration is a little different from the master server. It is configured in a different ways both for cloud and on-premise instances. That is because AWS RDS MySQL master server user does not have SUPER privileges. To achieve replication, we have to use entirely different SQL commands for AWS RDS MySQL instances.
Use below commands to access the slave MySQL server CLI and set master attributes:mysql -u admin -h 54.69.26.174 -p
mysql>
call mysql.rds_set_external_master ('35.160.2.201', 3306, 'slaveUser', 'Password@123', 'mysql-bin-changelog.000041', 1126, 0);
mysql>
quit;
- Replace 35.160.2.201 with the IP address of your master MySQL server.
- Replace mysql-bin-changelog.000041
and 1126 with the changelog file
name and log position number. Get these values by running
SHOW MASTER STATUS;command in master MySQL server.
Now this is all that is needed in order to configure slave server to replicate data from master server. But if you start the replication process, It will give you an error. In the next section we will configure security groups to solve this issue.
Modifying master security group
Master MySQL server can only be accessed from the system network. Since slave needed to connect to the master server to read changelog files, we need to add allow rule for the slave server in master server's security group. To achieve this, search and open Security groups in AWS. You will see the list of available security groups like in below image:

Select master-db_secGroup as shown in above image. Now select Inbound rules > Edit inbound rules > Add rule to add a new rule for the slave server. Enter the public IP address of slave server here as shown in below image:
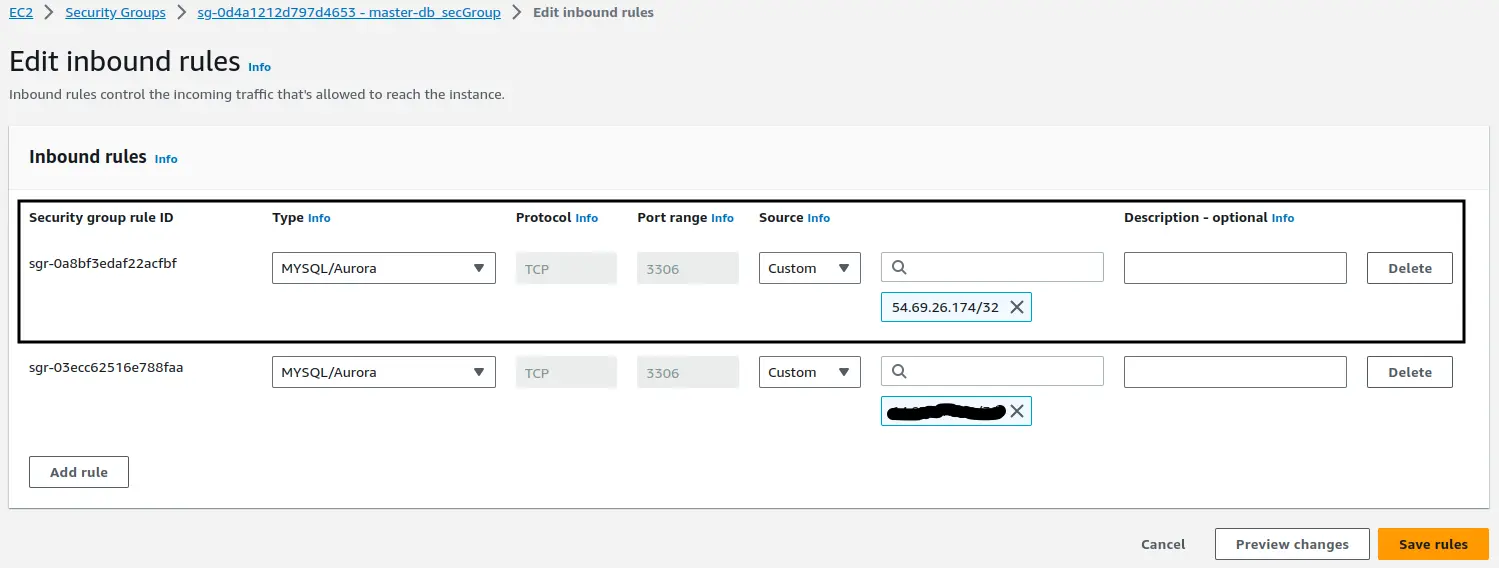
After creating a new rule in the security group, master MySQL server can be accessed from two hosts. One is the slave MySQL server and second is the system host where AWS account is logged in.
Testing
Now login to your MySQL slave server. In MySQL CLI, execute the following SQL commands to test the master-slave replication connection:
call mysql.rds_start_replication;
mysql>
SHOW SLAVE STATUS \G;
- call ... command will start the slave process by trying to establish a connection to the master server.
- SHOW ... command will show the details of master-slave replications process. If there is any error in establishing a connection, It'll be shown here. You will see the output as below image:
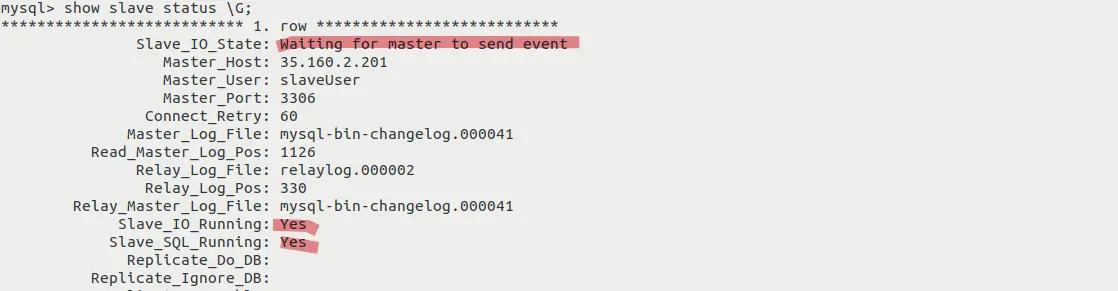
If your Slave_IO_State is in Waiting for ... mode, Slave_IO_Running and Slave_SQL_Running is Yes, then your master-slave replication is working successfully. Try to do any CREATE or DROP operation on the master database, changes will be replicated on the slave server immediately.
This way we can set up RDS MySQL servers as master and slave for replications between two different AWS accounts. Keep one thing in mind, It's one-way replication. All the changes on the master server will be replicated on the slave server but any changes made on the slave server will stay on the slave server.