In this article I'll be demonstrating how you can configure MySQL master and slave server. It is the concept of synchronization where any changes made to the master server will reflect on the slave server. In this setup, I'll be using MySQL 8.0.34 on Ubuntu 22.04.2 LTSsystem. I'm using my host system as the master server and another Ubuntu running on VMware as my slave server. As we are testing this method locally, make sure both systems are on the same network and subnet.
In this MySQL master-slave configuration, data from master server will be continuously in-sync with slave server. I think It's clear by now that It's a one-way replication. All the database changes made on master server will be reflected on slave server but any database changes made in the slave server will stay on the slave server.
Launch two mysql servers on same network
You need two MySQL servers on same network. To achieve this, I'll install one mysql server on my host system that will act as master server. For the second server, I'll be using Ubuntu running on VMware which will act as slave server.
IP address for master server is 192.168.1.10 and 192.168.1.20 for slave server. Use the below command on both systems to install MySQL server:
sudo apt install mysql-server
After installing the package, access MySQL CLI using sudo mysql command. Now run the below sql command to set password for root user:
ALTER USER 'root'@'localhost' IDENTIFIED WITH mysql_native_password BY 'password';
This SQL command will set a new password for root user. Replace password with your desired password.
Setup master MySQL server
In this section we'll set up master server. As I mentioned above, I'll use MySQL server on the host system. First, we will make the required changes in MySQL configuration file and then we'll create a dedicated slave user using some SQL commands.
Modifying configuration file
In order to configure master server for replication to slave server, there are some configuration changes that need to be done. Open your MySQL configuration file using the below command:
sudo nano /etc/mysql/mysql.conf.d/mysqld.cnf
In the end of this file, add the following lines:
server-id=1
log-bin=/var/log/mysql/mysql-bin.log
binlog_expire_logs_seconds=2592000
max_binlog_size=100M
Now save and close the file. There is one more thing that needs to be changed. Run the below command:
sudo sed -i '0,/bind-address/s/bind-address/#bind-address/' /etc/mysql/mysql.conf.d/mysqld.cnf
This command will comment the bind-address line from configuration file. You can do it manually if you want. Commenting out this line will make sure that our MySQL server is no longer limited to just host system. It can now be accessed from the local network using system IP address.
Now in order to make changes effective, MySQL server needs to restart. Use the following command to do this:
sudo systemctl restart mysql
If your modified file configuration is correct, MySQL server will restart normally. Otherwise, It will give you error. Use sudo journalctl -xeu mysql.service command for error detail and try to fix it. Usually, It's a syntax error.
Creating slave user on master server
In this part we'll create a new SQL user dedicated to slave server. User will be created by mapping it to slave server IP address so that only requests originating from slave server IP address can make successful connection to master server.
Run the below commands to start MySQL CLI and create a user with appropriate permissions:mysql -u root -p
mysql>
CREATE USER 'slave_user'@'192.168.1.20' IDENTIFIED WITH mysql_native_password BY 'Password@123';
mysql>
GRANT REPLICATION SLAVE ON *.* TO 'slave_user'@'192.168.1.20';
mysql>
FLUSH PRIVILEGES;
mysql>
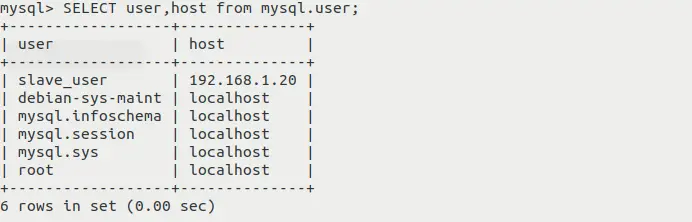
SELECT user,host from mysql.user;
- We have created a new user slave_user with password set to Password@123. Here the IP address specified is 192.168.1.20 which belongs to slave server. It simply means that this user can only connect to this MySQL server (master server) if the connection request originates from the specified IP address. You should replace it with the IP address of your slave server.
- Command GRANT REPLICATION ... will grant replication privileges on all databases and tables to the specified user.
- FLUSH PRIVILEGES; command will make the changes effective by telling MySQL server to re-read the privilege and access rights information.
- SELECT user,host ... command will show you MySQL user and host detail. You will see a similar output like below image:
Master server configuration is completed with this part. In the next section, we will look at slave server and Its required configuration.
Setup slave MySQL server
For this purpose, I'll be using MySQL server running on VMware Ubuntu. We need to make some changes in the mysql configuration file. Run these commands to comment bind-address line and open the file:
sudo sed -i '0,/bind-address/s/bind-address/#bind-address/' /etc/mysql/mysql.conf.d/mysqld.cnf
$
sudo nano /etc/mysql/mysql.conf.d/mysqld.cnf
Now add the following lines in configuration file:
server-id=2
log-bin=/var/log/mysql/mysql-bin.log
binlog_expire_logs_seconds=2592000
max_binlog_size=100M
Now save and close the file. Keep in mind that server-id should be different for master and slave server. Restart the MySQL server to make changes effective using sudo systemctl restart mysql command. The syntax of lines added in the configuration file should be correct. If log-bin path does not exist in the system then you are more likely to get an error while restarting server. So make sure the path exist.
If your MySQL server restarted successfully, It means your configuration is correct. Now we need to run some SQL commands to specify the master server details. Use below command to start MySQL CLI and execute the mentioned SQL commands:
mysql -u root -p
mysql>
CHANGE MASTER TO
->
MASTER_HOST='192.168.1.10',
->
MASTER_USER='slave_user',
->
MASTER_PASSWORD='Password@123',
->
MASTER_LOG_FILE='mysql-bin.000008',
->
MASTER_LOG_POS=157;
mysql>
START SLAVE;
mysql>
SHOW SLAVE STATUS \G;
- Replace 192.168.1.10 with the IP address of your master server.
- Replace mysql-bin.000008 and 157 with the name of your master server log file name and log position number. You can get these attributes by running
SHOW MASTER STATUS;SQL command on master server. You'll see the similar output shown in below image:
- MySQL use TCP 3306 port by default but If you have deployed your MySQL master server on a different port, use
MASTER_PORT=[port_number]option to specify custom port. - START SLAVE; will start the process of replication data from master server to the slave server.
- SHOW SLAVE STATUS \G; shows the detailed information of slave. \G is used to output information in readble format. You'll see the output something like thi image:
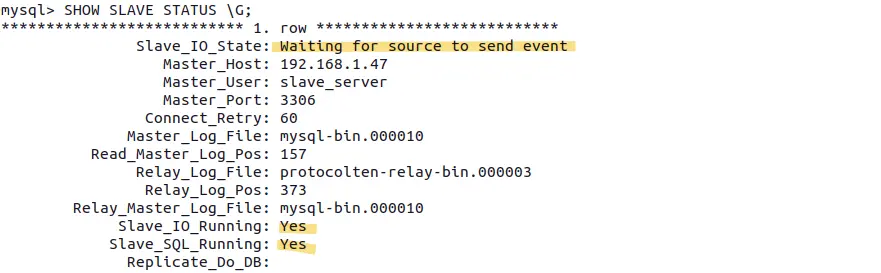
If you are seeing these highlighted values in your output, it means your slave replication is working fine. Now every database change made on the master server will be replicated on the slave server automatically.
Conclusion
This way you can easily configure on-premise MySQL master and slave server replication. Just for teaching purposes, I used % (wildcard) and weak passwords, but in the production environment you should use stronger passwords and only allow slave user to connect from a specific host while creating it on the master server. If your MySQL servers are dedicated systems, then you should also configure the system firewall on both master and slave servers to allow Inbound traffic on port 3306 from the specific IP address.